How To: Mac Change SUDO Timeout

If you use Terminal and are often using sudo commands, you can increase the sudo password timeout so you aren’t prompted so often to re-enter your password for certain sudo commands. We will need to edit the sudoers file in /etc/. Follow the below steps.
1. Open Terminal (Applications -> Utilities -> Terminal)
2. Type the following command and hit return.
sudo visudo
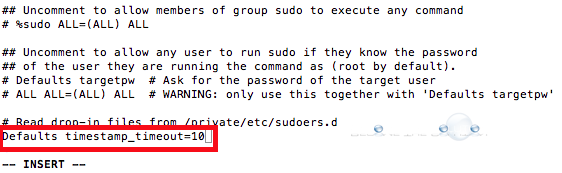
3. Use your arrow key and go down to the bottom of this file we are editing pictured below.
4. Insert a new line – type s or something then hit return to start the new line. You can enter the following lines that will do the following. The timeouts are based on minutes.
Defaults timestamp_timeout=0
Defaults timestamp_timeout=10
Defaults timestamp_timeout=-1
5. In this example, we will use 10 minutes for our password caching
Defaults timestamp_timeout=10
6. Once you typed in the line, hit Escape (ESC). Then type Colon : and finally type wq and hit return to save changes.
7. You can repeat step 2 to verify your sudoers file is saved with your updates.
8. In order for your updates to take affect, re-launch Terminal.
To learn more about sudo and the sudoers file, type
man sudoers
Comments