How to mine Crypto Currency with your Mac’s CPU

So…you want to use that old or new Mac to mine some Crypto? With all the craze in crypto today, it’s everyone’s dream to let their computer do the heavy lifting, mine some random crypto, and then cash it in for money. In this guide, we will you show how to mine Monero (XMR) crypto currency using only your Mac’s CPU. At the time of this article, this is the easiest and most profitable method of mining with a basic Mac Desktop using your Mac’s CPU only.
Prerequisites you need before mining:
Monero Crypto Wallet – We use Coinomi. This is a universal Crypto wallet.
This guide was done on macOS Catalina 10.15.7. I do not know if this will work on macOS versions previous or later.
1. We will be using XMRIg to mine Monero (XMR). In order to use XMRIg on Mac, you will need to install some prerequisites.
2. Install Homebrew. In Terminal type:
/bin/bash -c "$(curl -fsSL https://raw.githubusercontent.com/Homebrew/install/HEAD/install.sh)"
3. Next, install XMRIg. Open Terminal and type the following commands. XMRIg will install in /Users/USER/xmrig/.
a. brew install cmake libuv openssl hwloc
b. git clone https://github.com/xmrig/xmrig.git
c. mkdir xmrig/build && cd xmrig/build
d. cmake .. -DOPENSSL_ROOT_DIR=/usr/local/opt/openssl
e. make -j$(sysctl -n hw.logicalcpu)
4. Now, we need to create a new configuration file in order to run XMRIg. The easiest way is to do this with the XMRIg wizard here.
- Add Pool: choose any pool here. Wallet address is the address to your Monero wallet you created (receive Monero payments address)
- Backends: CPU
- Misc: We donate 5 percent but this can be what you want.
5. Download the config.json file and place it in /Users/USER/xmrig/build folder.
Start XMRIg on macOS
1. Open Terminal.
2. cd /Users/USER/xmrig/build
3. ./xmrig
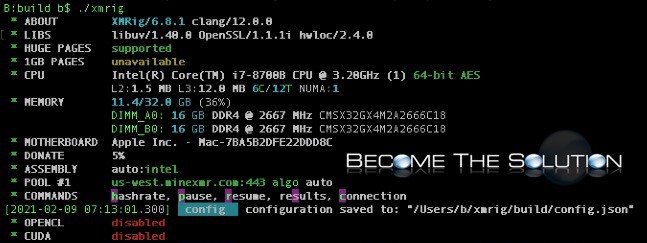
XMRIg will begin mining. The first screen in Terminal will show you your Mac’s system details. By default, XMRIg will mine using your Mac’s CPU most effectively, so you won’t have to worry about not using all your CPU power for it.
So what’s the all the XMRIg activity mean? See below.
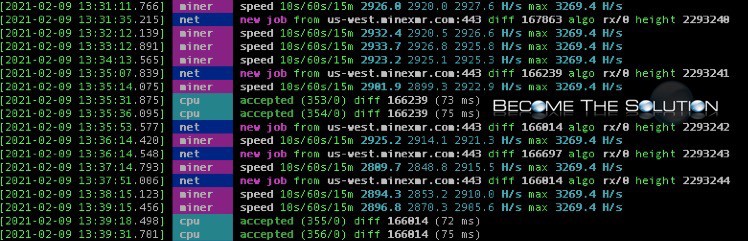
miner – speed: line tells you your miner's hash rate. As far as I can tell, this shows three hash rates over three different rolling windows of 2.5 seconds, a minute, and 15 minutes. The hash rate stays fairly constant at close to 1200 H/s. Your miner hasn't been running for 15 minutes yet.
net – new job: line means the pool just sent your miner some work. Your miner will then repeatedly hash this data to find hashes below the requested target (which comes as part of that job). The last number of that line is the difficulty for that job. The higher it is, the harder it is to find a qualifying hash, but the more any solution counts towards your share of the block reward when the pool finds a block next.
cpu – accepted: line means the pool acknowledged receipt of a hash your miner found. 3/0 means this is the third accepted hash, and none were rejected (which can happen for various reasons, such as being for a previous job, below the requested difficulty, or otherwise invalid).
When does XMRIg pay me for my mining?
Check with the miner pool you joined. Your miner pool will be able to show you how much you’ve mined, your average hash rates, and your payouts. All you need to do is tell them your Wallet ID in most cases. In our case, we will only get paid once we’ve mined 0.5 XMR.
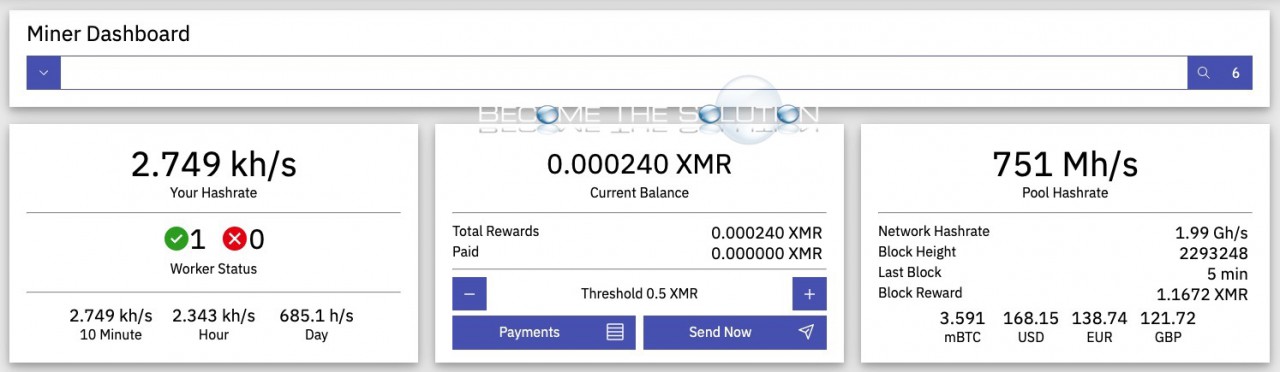
So is crypto mining with Mac’s CPU worth it?
We hate to admit it, but it’s not. We’ve mined with our intel Mac Mini (3269.4 H/s) for one day and only earned 6 cents. It’s not going to make us any money long term. However, it’s possible the upcoming Mac “M” chips prove to be worth of CPU mining. We will wait and see.
Please use the comments area below to share your Crypto Mining speeds, success rates, and payouts. Please ensure to include relevant Mac system details!
Comments 1
FYI for M1 Mac's homebrew installs openssl in a different location. I just updated the instruction
3. d. to:
cmake .. -DOPENSSL_ROOT_DIR=/opt/homebrew/Cellar/openssl@1.1/1.1.1k
Note that you may have a different version letter so instead of 1.1.1k you might have something else on your machine.
Otherwise THANKS FOR THE INSTALL INSTRUCTIONS! Great guide.