Enable IdentD in Latest Mac OS X
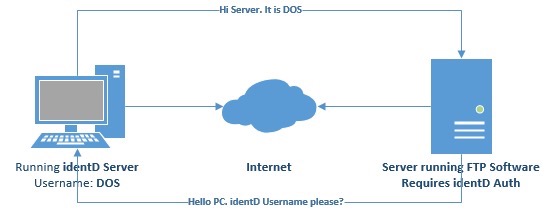
Identd is a service that sends a username in plain text across port 113 when requested. You specify a text name in the application (typically a username) and run the service. The original purpose of identD was to “validate” a user was who they are saying they are when they cross over the Internet. In the past, identD was commonly used for IRC and FTP sites.
How does identD work?

There was once an application that enabled and disabled the identD service in Mac X. This application no longer works in the latest versions of Mac. Luckily, someone wrote a Unix executable that creates an identD service and can be started automatically when your Mac boots.
Step 1: Download the new version of identD located here and extract to your Desktop.
Step 2: Run these commands to properly configure identD in Mac X Terminal.
# Preparesudo mkdir -p /usr/local/identdsudo chown root:wheel /usr/local/identd
# Installcd ~/Desktop/identd/sudo cp ./identd /usr/local/identd/sudo cp ./identd.conf /usr/local/identd/sudo cp ./org.macmax.identd.plist /Library/LaunchDaemons/sudo chown root:wheel /usr/local/identd/identdsudo chmod 755 /usr/local/identd/identdsudo chown root:wheel /usr/local/identd/identd.confsudo chmod 644 /usr/local/identd/identd.confsudo chown root:wheel /Library/LaunchDaemons/org.macmax.identd.plistsudo chmod 644 /Library/LaunchDaemons/org.macmax.identd.plist
# Load and set to Auto Start on Mac X bootsudo launchctl load /Library/LaunchDaemons/org.macmax.identd.plist
Step 3: Test your new identD installation and ensure the service started and is running. Type in Terminal:
telnet localhost 113
This should return:
Trying ::1...
Connected to localhost.
Escape character is '^]'.
Step 4: Change your identD username. Go to /usr/local/identd/identd.conf. You can open identd.conf in TextEdit.
Type in the username. Use the format listed below in the screenshot. Ensure you have a "1" in front of the username to enable identd.

You should drag that file out of that path to your desktop to be able to edit and save it. Then drag it back.
Finally, we need to allow the identD service on the Mac X built-in firewall – IF you have this enabled. Navigate to -> System Preferences -> Security & Privacy -> Firewall -> Firewall Options.
Click the + and browse to /usr/local/identd/ and add the identd app. Ensure to Allow incoming connections per the screenshot below.

* Please use the comment form below. Comments are moderated.*


Comments