Two Same Wireless Network ID's SSID's One Router
If you own a property that needs more wireless coverage than your traditional wireless access point or router can handle, you may want to invest in a 2nd router that expands your same wireless network. There are many ways to expand or repeat your current wireless network. We're going to review the most efficient and easy way to do this.
Scenario:
You have a router that broadcasts a Wireless A/B/G/N network ID (SSID) of 'ROUTER-HOME'
ou aren't able to access the 'ROUTER-HOME' network in several areas of your house (Basement, different floors, outside, etc.).
First, determine where you will need to broaden the network range. Identify a key location for where you will originate the expansion of your network (place your second router.)
You'll want to pickup the following hardware.
- Netgear Powerline AV500 - $49.00 Amazon
- Netgear RangeMax Wireless Router - $21.99 Amazon
The Netgear Powerline converters will convert your wired Ethernet Internet signal from your router already in your home to travel through your home's electrical outlets. Depending on the age of your electrical wiring inside your home, these work fantastic to bring hi-speed Internet into a room of your home.
The Netgear RangeMax Wireless Router will be use to convert the powerline wired Internet to extend your wireless network on this new router.
Once you receive the Netgear Powerline AV500's, follow Netgear instructions here for installing and pairing the adapters with your current home router.
Remember to leave the distance powerline unit in the room where we will be extending the ROUTER-HOME' network.
Next, login to your home router you have installed. You are likely using DHCP to hand out IP addresses. We need to limit the "range" of IP's your router is handing out. Login and find your DHCP address range. This looks different for every router.

In this example, our Router was originally handing out a range in 192.168.1.2 - 254. We changed this to be 192.168.1.2 - 248, thus freeing up 192.168.1.249 - 254.
For our new router, we will assign it 192.168.1.249. See below for how we do this.
Next, setup the RangeMax Wireless router. Connect to the router with a laptop and using DHCP in your Laptop's network options. The Default IP Address of this router is 192.168.1.1. Login with admin as userID and password as the password for the device.
Here are the tasks to complete on your new router, in order.
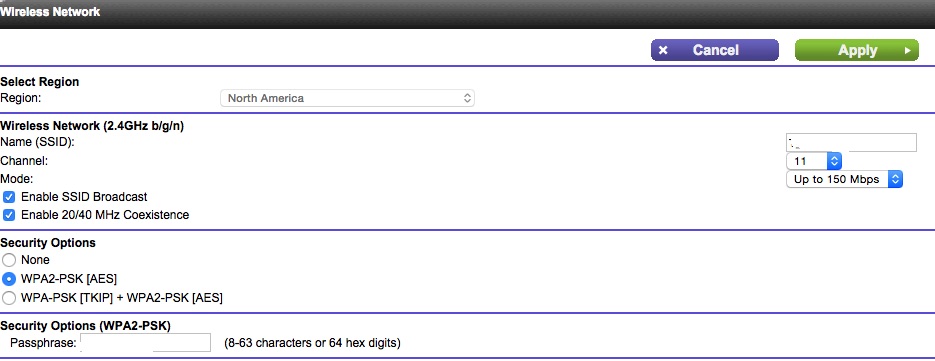
- Setup the new router with exact wireless settings as your current router. Same NAME (SSID) and encryption settings. If you don't know these, login to your other router and verify.

- We will change the wireless channel on the new router. It's likely you aren't using Channel 11 on your current router - change it to be channel 11 shown above
- Now, assign the router's LAN IP to be 192.168.1.249 show below. Copy the same subnet mask pictured 255.255.255.0

- Since your new router is acting as a "client", we are not configuring this router's WAN port. At this point, the router is ready to be deployed.
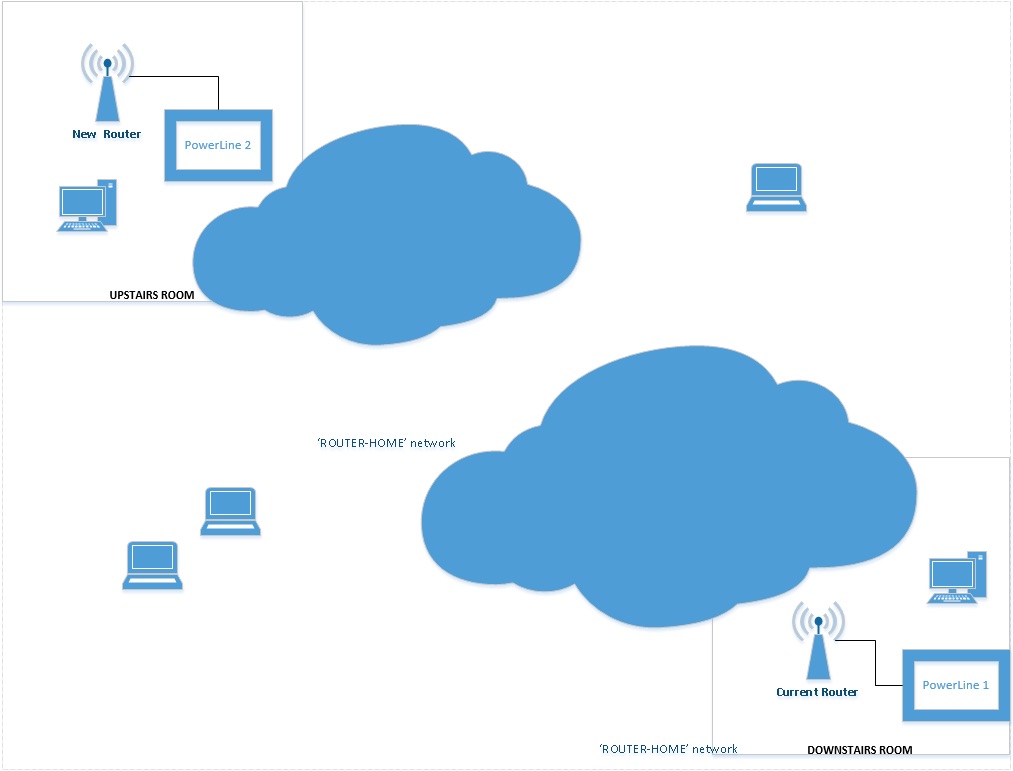
Here's a diagram to demonstrate where we're at

Plug your new router into the powerline. Remember to plug into one of the 4 LAN outlets on the back of your router - NOT the WAN port. At this point, your new router is extending your same wireless network inside of your house. You can verify this by bringing a newtwork device up to the room and verifying you're getting a strong signal from the same network.
If you have problems or need help, please post below. We will walk you through anything we can!


Comments